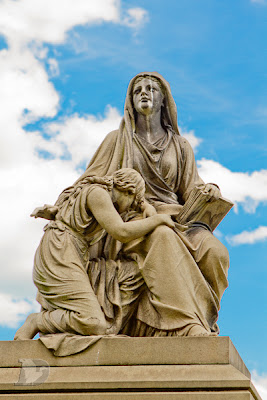
 In bright, high contrast situations it is often difficult to get an exposure that reflects what your eyes see. In the image shown here, if you expose for the sky, the subject becomes dark (underexposed). If you expose for the subject, the sky gets blown out (overexposed).
Of course there are many ways to correct for this, including tone mapping for HDR. But that requires a minimum of three images. As a photographer we don't always have that luxury. Fortunately for us technology has come a long way and if you are shooting in RAW you have a great deal of leeway in extending your image's dynamic range.
This simple technique, although demonstrated using Adobe's Lightroom 3, can be done with most high end photo editing programs available today. Here's how this works.
 |
| Original image |
As you can see the figure is slightly underexposed and the sky is slightly overexposed. This was achieved by metering the subject until the camera's meter gave me a proper exposure. In this particular case it found a nice middle point between the darkness of the subject and the brightness of the sky.
By itself, this image is rather boring and unimpressive. This is the kind of image most typical shooters will get. But we want to take this to the next level. We want people viewing our images to go, "wow!"
 |
| Fill Light applied |
Since we have the information available on our RAW file, LR simply shifts the dark pixels over to the light side. The nice thing about this tool is that it uses complex algorithms to lighten the dark parts of the image. Unlike the brighten tool that just adds brightness to all the pixels, fill light uses more of a 'sliding scale' method (for lack of a better analogy).
You can see that the really deep shadows have receded (brightened) a lot while the mid tones not as much. Then when you look at the sky, the blue has lightened just a touch. If we had used the brighten tool that sky would have gone completely to white.
So now we brought out the detail in our shadows but the image is rather flat and washed out looking. We also lost too much in our clouds. Remember that in our original image the sky was slightly overexposed. We need to get some of that information back.
 |
| Recovery applied |
You can see that we have regained some detail in the clouds but our subject really looks washed out. The reason for this is that we effectively squished our dark and light tones to the middle and expanded our mid tones further to the outside. An over simplification but you get the point.
*NOTE: In Lightroom 4 fill light and recovery have been renamed to shadows and highlights but they all do the same thing.
Tonally our image is looking much better than when we started. Now all we have to do is fix our washed out look and we should be good to go.
 |
| Black levels adjusted |
With all these adjustments some images tend to either gain or loose color saturation. A simple push on the saturation slider and the problem is fixed. In this example I would like to see more saturation in the sky only. I feel the color saturation on the statue is fine. You, however, may feel decreasing the saturation on the statue is appropriate. This is all personal choice. For myself, pumping up the blues in the sky felt like the right thing to do.
The image on the left is the final results. You can see that by bringing the saturation on the blue of the sky we go from a bland, washed out sky to one that's vibrant and more pleasing.
This was done by going to the HSL part of the HSL/Color/B&W module and selecting the live adjust tool (small circle button on the upper left corner) in the saturation part of the tool. This allows me to click and drag adjust directly on the image itself. Here I simply selected a portion of the sky, clicked and dragged upwards (to add) saturation to the color selected.
In review, use fill light to regain your shadow details, recovery to regain highlights and blacks to pump up your black level. From there adjust you saturation levels accordingly. Enjoy.


Comments
Post a Comment
Post a comment only if it adds to the topic being discussed. Spam, hate or derogatory comments will not be allowed.