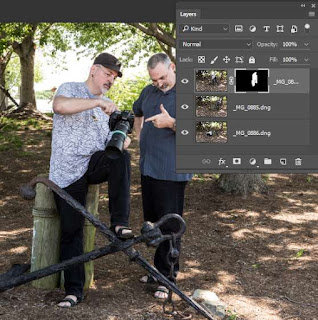
One of our more popular events is the Multiplicity shoot. This is a fun selfie portrait event where we set up our cameras, take multiple photos of ourselves and combine them into a single frame so it looks like we're interacting with our twins. At right is an example of one my grandson and I did together a few years ago.
While it may seem complicated, the editing part is quite simple. I'll walk you through the steps to accomplish this effect.
Use whichever method is easiest for you to sort through your images to select the ones you want to use for your final composite. Make a note of the file names and launch your Photoshop program. Once open go to File / Scripts / Load files into stack... This will load all the selected images into a stack ready for editing.
In order to make it a little easier it is best to keep the layers ordered by how the subjects (you) are layered from front to back. Meaning the foremost subject will be at the top of the stack while the furthest subject will be at the bottom of the stack.
Once rearranged it's time to decide how you want to approach compositing. There are two ways, top to bottom (front to back) or bottom to top (back to front). Either way works just as effectively and the end result will be identical. It's just a matter of what feels comfortable to you.
To differentiate between the layer or the mask being selected just look for the white frame around the thumbnail, as seen in the image at left. In this example the mask is selected.
A note about layer masks: a mask, as the name implies, hides whatever is underneath it. In Photoshop, masks are handled with shades of black and white. Black hides while white reveals. Since we are dealing with a mask attached to a layer, it only hides or shows whatever is in that one layer it is attached to. Hiding part of a layer allows the next layer down the stack to show through.
 In our example we want to composite the top image with the next layer down. Meaning we want to hide everything but the main subject so we can see the layer below. We can go ahead and mask out all the background but that usually takes a lot of brushing. An easier way is to brush out the main subject and then invert the mask.
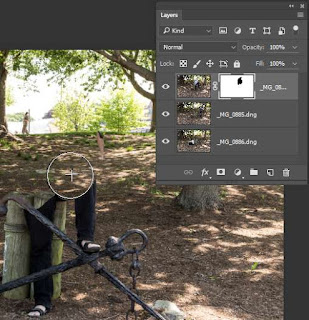
Make sure you're on the layer you want to mask and that the layer mask is selected. Click on the brush tool in the toolbox and set it so it's at 100% flow and 100% opacity with a feather of about 80%. Next make sure that black is selected as the foreground color and begin brushing out the main subject (as seen at right).
As you brush over the subject it will look like it disappears since the underlying layer starts coming through. You don't need to be super careful but there's no need to be sloppy either. You also want to pay attention to shadows cast by the subject also.
 As you paint on the mask you will see a representation of your progress in the thumbnail. It will look like a black blob on the white mask. Keep painting until the entirety of the subject is gone. Now for the magic... Invert the mask by pressing CTR+I (CMD+I on a Mac). This will cause the mask to invert colors; black becomes white and white becomes black. This is a time saver and makes painting masks a little easier.
With any luck, you should now see two subjects in the frame, the top layer and the next layer down (if you're working top to bottom).
If there are any areas where one subject overlaps the other, zoom in to where they meet and clean up the mask so it looks correct. Working on the same layer mask brush black around the outside of the subject to fix any overlaps. If you make a mistake switch the foreground color to white (X key toggles foreground/background) and clean up the edges. Adjust brush size ( [ or ] bracket keys) as needed until you have a realistic composition.
While it may seem complicated, the editing part is quite simple. I'll walk you through the steps to accomplish this effect.
Loading selected images from Lightroom
I use Lightroom quite extensively. Because it is an Adobe product, it plays nicely with Photoshop, the program we'll be using to assemble our multiplicity image.
The first step is to go through the multiple images you took and select the various photos you think you'll want to use in your final rendition. If you have two similar posses you are not sure about use them both, you can disregard the ones you end up not using.
After culling through your selection, select the images by holding down the CTRL key as you click on the images you want to include in the composite. Once selected go to the top menu and select Photo / Edit in / Open as layers in Photoshop. This will load all the selected images into a stack ready for editing.
After culling through your selection, select the images by holding down the CTRL key as you click on the images you want to include in the composite. Once selected go to the top menu and select Photo / Edit in / Open as layers in Photoshop. This will load all the selected images into a stack ready for editing.
Opening selected images into a stack in Photoshop
If you don't have Lightroom (or don't use it) an alternative way of loading your selected images into a stack is to use Photoshop's handy script.
Use whichever method is easiest for you to sort through your images to select the ones you want to use for your final composite. Make a note of the file names and launch your Photoshop program. Once open go to File / Scripts / Load files into stack... This will load all the selected images into a stack ready for editing.
Compositing images in Photoshop
Once loaded, combining your images into a single multiplicity photo is easy enough. The most difficult part will probably be trying to keep track of what layer is what.In order to make it a little easier it is best to keep the layers ordered by how the subjects (you) are layered from front to back. Meaning the foremost subject will be at the top of the stack while the furthest subject will be at the bottom of the stack.
Once rearranged it's time to decide how you want to approach compositing. There are two ways, top to bottom (front to back) or bottom to top (back to front). Either way works just as effectively and the end result will be identical. It's just a matter of what feels comfortable to you.
...back to frontTo work back to front you will need to hide all the layers in the stack but the bottom two. To hide a layer click on the eye icon to the left of the layer thumbnail. The lowest layer will become the master plate that the composite gets built on. To start the process create a layer mask on the next layer up from the bottom. | ...front to backTo work back to front you don't need to hide the layers as in the above process but just remember that the bottommost layer is still the master plate. To start the process from the top create a layer mask on the topmost layer. |
Creating a layer mask
To create a layer mask first select the layer you want to add the mask to (top or bottom). Next click on the layer mask icon at the bottom of the layers window (the white rectangle with the dark circle in the center). A white rectangle will be displayed right next to the layer thumbnail.To differentiate between the layer or the mask being selected just look for the white frame around the thumbnail, as seen in the image at left. In this example the mask is selected.
A note about layer masks: a mask, as the name implies, hides whatever is underneath it. In Photoshop, masks are handled with shades of black and white. Black hides while white reveals. Since we are dealing with a mask attached to a layer, it only hides or shows whatever is in that one layer it is attached to. Hiding part of a layer allows the next layer down the stack to show through.
Brushing on a mask
 In our example we want to composite the top image with the next layer down. Meaning we want to hide everything but the main subject so we can see the layer below. We can go ahead and mask out all the background but that usually takes a lot of brushing. An easier way is to brush out the main subject and then invert the mask.
Make sure you're on the layer you want to mask and that the layer mask is selected. Click on the brush tool in the toolbox and set it so it's at 100% flow and 100% opacity with a feather of about 80%. Next make sure that black is selected as the foreground color and begin brushing out the main subject (as seen at right).
As you brush over the subject it will look like it disappears since the underlying layer starts coming through. You don't need to be super careful but there's no need to be sloppy either. You also want to pay attention to shadows cast by the subject also.
 As you paint on the mask you will see a representation of your progress in the thumbnail. It will look like a black blob on the white mask. Keep painting until the entirety of the subject is gone. Now for the magic... Invert the mask by pressing CTR+I (CMD+I on a Mac). This will cause the mask to invert colors; black becomes white and white becomes black. This is a time saver and makes painting masks a little easier.
With any luck, you should now see two subjects in the frame, the top layer and the next layer down (if you're working top to bottom).
If there are any areas where one subject overlaps the other, zoom in to where they meet and clean up the mask so it looks correct. Working on the same layer mask brush black around the outside of the subject to fix any overlaps. If you make a mistake switch the foreground color to white (X key toggles foreground/background) and clean up the edges. Adjust brush size ( [ or ] bracket keys) as needed until you have a realistic composition.
...continuing back to frontClick on the eye icon on the next layer up to unhide the layer. This will hide what you just did. Don't worry. Select the new layer and repeat the process. Add layer mask, brush out the subject, invert mask, clean edges. | ...continuing front to backSelect the next layer down and repeat the same process as before; add layer mask, brush out the subject, invert mask, clean edges. |
A few notes and tips
It takes a few tries to get used to the concept of hiding and revealing stuff with layer masks so don't be afraid to make mistakes. Remember that switching foreground/background colors allows you to work the mask.
If you find yourself at a loss, hide all the layers except the one you are working on. This gets rid of all the distractions and lets you concentrate on getting a clean mask.
Use the same masking technique to fix background distractions. For example, a person or vehicle that entered your shot in the background you rather wouldn't want in your shot. You can also hide tools like light stands, assistants and other support props by taking a clean plate shot and using that as your base image.


One of those 3 guys is really handsome...the other two are...neh.
ReplyDeleteYeah, the one with his head down. :-D
ReplyDeleteGreat to meet you tonight at Candlewood Camera.
ReplyDeleteThank you. I had a great time. Looking forward to visiting again in the future.
ReplyDelete